Skip to product information
1 of 3

AnyFone JAPAN Data eSIM

Japan eSIM Fixed Data

Japan eSIM Fixed Data

Regular price ¥990
Regular price Sale price ¥990
Sale Sold out
Taxes included.
Data Volume
Options

Please Check Before Purchase

Before completing your order, please make sure that your device is eSIM Compatible.
Check Compatibility

Product Description

Line Type 3G / 4G
Data Volume 3GB
Carrier Network docomo, IIJ
Coverage Area Japan
Tethering (Personal Hotspot) Available
After using up Communication is still possible at 256kbps even after high speed data used-up
Voice Calls Not Supported (Only via VoIP app)
eSIM Delivery Method Sent by Email
Issuance Time Immediate

APN

APN vmobile.jp
User Name Setup not required
Password Setup not required

Important Notice

  1. Please start activating within 30 days of purchase. After 30 days, activation will no longer be possible.
  2. The first day of use is counted from the time of activation until 23:59 Japan time. Please note that even if the validity period has passed, your connection may not be cut off immediately. However, rest assured that it will not be automatically recharged (extended or billed).
  3. If you are using an Android device and are not connected to the internet after setting up the eSIM, please manually configure the APN using the information provided in the email. You can configure the APN by going to: [Settings] → [Network & Internet] → [Mobile Network] → [Access Point Names]
  4. If you are using a Google Pixel device and still cannot connect to the network even after setting up the eSIM and APN, please enable roaming in the settings. To turn on roaming: Go to [Settings] → [Network & Internet], tap the settings icon next to the eSIM you configured, and turn on the Roaming option.The first day of use is counted from the time of activation until 11:59 PM Japan time. Please note that even if the validity period has passed, your connection may not be cut off immediately. However, rest assured that it will not be automatically recharged (extended or billed).
View full details
Japan eSIM Fixed Data
Selected Variant Image
Data Volume: 3GB
Options: 1 day
Regular price ¥990
Regular price Sale price ¥990
Selected Variant Image
Japan eSIM Fixed Data
Data Volume: 3GB
Options: 1 day
Regular price ¥990
Regular price Sale price ¥990
  • Step 1

    Check Compatibility

    Please check if your smartphone meets the following conditions before purchasing:

    1. It is SIM unlocked or SIM-free.
    2. It is eSIM compatible.
    How to Check eSIM Compatibility? 
  • Step 2

    Select Data Plan

    Please select your desired product model, options, and quantity, then proceed to checkout. During the checkout process, you will be required to enter your name, email address (for receiving the eSIM QR code), billing address, and credit card information.

  • Step 3

    Receive eSIM QR Code

    The eSIM installation QR code and setup instructions will be sent to your email address.

Icon Image

40 Plans to Choose From

A comprehensive lineup of 40 plans designed to meet every traveler’s needs. Our reliable 4G network covers almost all areas of Japan, ensuring stable data access anytime, anywhere.

Icon Image

No App, No Sign-up Required

No app downloads or setup completion required. Simply scan the QR code and receive online instantly.

Icon Image

Flexible Choice of Data Amount and Validity Period

Select from 5 data options ranging from 3GB to 30GB, and 13 validity periods from 1 day to 30 days. Customize your plan by combining the data volume and duration that best suit your travel needs.

Icon Image

High-quality MNO/MVNO Network

All plans run on major Japanese carrier networks (docomo / IIJ) for fast and stable connectivity. With 99% nationwide coverage, you can stay connected even in rural areas and mountainous regions.

Icon Image

Purchase Anytime, Even While Traveling

We accept credit cards issued outside Japan. You can make purchases online anytime—before your departure or during your stay in Japan. Convenient and reliable for travelers and returnees to Japan.

Icon Image

Reliable Customer Support

Both customer support and airport stores are directly managed by our company. Our professional bilingual (Japanese / English) staff will support you from the time of application to the end of your use.

Many airport stores and hotel businesses have joined us as eSIM site promotion partners.

How to Check if Device is eSIM Compatible

Frequently Asked Questions

How can I check if my device is compatible?

If you’re unsure of the model, please refer to the [How to Check Device Compatibility] section on the product page.

It provides clear instructions for checking your device via the settings menu or dial codes.

How do I receive the eSIM?

After completing your purchase, a QR code for installing the eSIM and setup instructions will be sent to the email address you provided.
In most cases, you’ll receive the email within a few minutes. If you don’t see the email, please check your spam or promotions folder. If it’s still missing, contact our customer support—we’ll resend it promptly.

Is it easy to set up an eSIM for beginners?

Yes, even first-time eSIM users can set it up with confidence.
We provide a step-by-step setup eSIM Activation Guide, making the process easy even for first-time users. Setup usually takes about 5 minutes.
If you have any concerns, our customer support is ready to assist you at any time.


Can I use the eSIM immediately after purchase?

Yes, you can.
Simply scan the QR code included in the confirmation email you receive after purchase. The eSIM will be installed instantly, and you’ll be able to connect to the internet right away.

For detailed instructions, please refer to our [eSIM Activation Guide] page.
If you have any questions, feel free to contact our customer support.

Do I need to remove my physical SIM card or delete my existing eSIM to set up a new one?

No, you do not need to remove your physical SIM card or delete your existing eSIM.
eSIM is a digital SIM that is downloaded directly to your device. Once installed, just check your mobile settings to ensure the eSIM is set as the active line, and you're ready to go.

The process is simple and can be completed in just a few minutes.

What should I do if I run out of data or need more during use?

With AnyFone JAPAN’s eSIM, you can easily purchase an additional data plan at any time to get back online right away.

Even if your current eSIM plan runs out, simply follow the same purchasing steps to install a new eSIM and continue using the service.

We offer flexible 5G Unlimited Plans ranging from 1 to 15 days, so you can choose only what you need. Perfect for unexpected data shortages during your trip—no waste, no stress.

eSIM Activation Guide

Once the purchase process is complete, a QR code and setup instructions will be sent to the email address you provided.
If you're unsure how to set it up, please refer to the guide below.

iPhone
Android

iPhone

▼ iOS 17.4 and Later

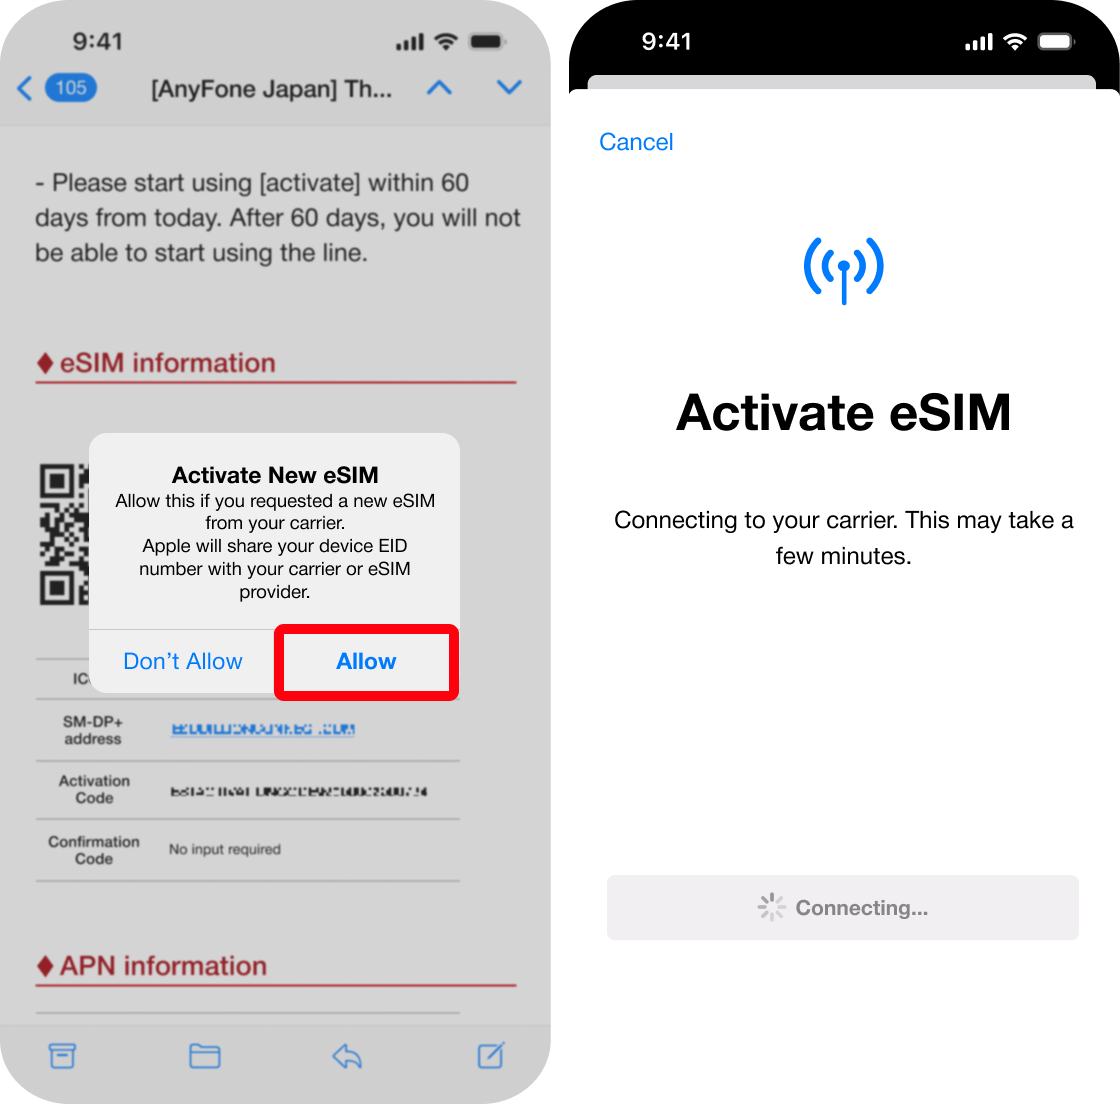
1Open the email with your eSIM information, long-press and hold the displayed QR code. Then tap [Add eSIM].
iOS 17.4 and Later Step 1
2When prompted to share your device EID number, tap [Allow].You will proceed to the Activate eSIM screen, follow the on-screen instructions to complete the setup.
iOS 17.4 and Later Step 2

※ In some email apps, pressing and holding the QR code may not work, or the [Add eSIM] option may not appear.
If that happens, please use one of the methods in “Method B to D” below, or use the default iPhone Mail app.


▼ iOS 17.3 and Earlier

1Open [Settings] and tap [Cellular].
iOS 17.3 and Earlier Step1
2Tap [Add eSIM], then select [Use QR code].
iOS 17.3 and Earlier Step2
3The camera will be activated. You can now choose one of the following options:
  • Method B Scan from "Open Photos"
  • Method C Enter Details Manually
  • Method D Scan from Another Device
iOS 17.3 and Earlier Step3
Method B:Scan from "Open Photos">
※ "Open Photos" may not be displayed depending on the version of iOS.
  1. Return to the email and long-press the QR code to save it to your photos.
  2. On the [Add eSIM] screen, select ["Open Photos"]
  3. Tap the saved QR code image to start the activation. Follow the on-screen instructions to complete the setup.
iOS 17.3 and Earlier Method B: Scan from Open Photos
Method C:Enter Details Manually>
  1. On the [Add eSIM] screen, select ["Enter Details Manually"]
  2. Enter the [SM-DP+ Address] and [Activation Code] provided in the email.
  3. Tap [Next] at the top right to start the activation. Follow the on-screen instructions to complete the setup.
Note: When copying the [SM-DP+ address], be sure to remove any unnecessary characters like [http://] or trailing slashes (e.g., [http://(SM-DP+address)/]).
iOS 17.3 and Earlier Method C: Enter Details Manually
Method D:Scan from Another Device>
  1. Display the QR code on another device or print it out.
  2. Use the camera on the [Add eSIM] screen to scan the QR code. Activation will begin automatically. Follow the on-screen instructions to complete the setup.
iImportant Notes
  • A network connection is required for eSIM setup. Please connect to Wi-Fi or mobile network first before proceeding with the following steps.
  • Activation may take a few minutes. After scanning the QR code, please wait until the “Setup Complete” message appears on the screen.

Android

1Open [Settings] and tap [Network & internet].
*Note : Settings might vary by manufacturer for Android devices.
Android eSIM Activation step 1
2Open [Add more], then tap [Download a SIM instead].
Android eSIM Activation step 2
3Tap [Next] to open the camera. Choose one of the following options:
  • If you are scanning a QR code: Display or print the QR code on another device, then scan it with the camera. Follow the on-screen instructions to complete the setup.
  • If setting up without a QR code (manual input): Tap [Help] at the bottom left and follow the instructions in steps 4 - 6.
Android eSIM Activation step 3
4Tap [Enter it manually] in the description.
Android eSIM Activation step 4
5Copy the [SM-DP+ ActvCode (for Android)] from the email we sent and paste it into the input field on your smartphone, then tap [Continue].
The image below shows the contents of the email on the left side and the Android screen on the right side.
Android eSIM Activation step 5
6When the following screen appears, tap [Download].
Android eSIM Activation step 6
iNotes
  • A network connection is required for eSIM setup. Please connect to Wi-Fi or mobile network first before proceeding with the following steps.
  • It may take a few minutes to activate an eSIM. Please wait a few moments after scanning the QR code until "Setup Complete" appears on the screen.
  • If you cannot connect to the internet after setting up:
    • If you set up using a QR code: Manually configure the APN information as described in the email.
      APN can be set from [Settings] > [Network & internet] > [Mobile Network] > [Access Point Name].
    • If you set up manually: Turn on roaming.
      Go to [Settings] > [Network and internet], tap the settings icon next to the eSIM you have set up, and turn on the roaming item.
    • If using a Google Pixel device and still unable to connect after setting up eSIM and APN, please go to roaming settings and turn on it.

Any Questions?

Committed to ensuring that you take advantage of every chance.
Please do not hesitate to contact our customer support at any time if you need further assistance.

Call Customer Support

050-5527-0564

10:00-13:00, 14:00-17:00 (Mon to Sun)